Preview and Test Checklists
Learn more about the different methods you can use to thoroughly test your content before releasing it to your audiences.
Table of Contents
Before pushing a checklist to your users, verify that it looks right, appears on the correct pages, targets the right audience, and checks off items as expected. There are three testing methods — use whichever fits your setup.
Choose a testing method
| Method | Best for | Tests targeting? | Tests completion? | Requires staging? |
|---|---|---|---|---|
| Preview | Quick visual review while building | No | No | No |
| Publish to staging | Full end-to-end testing in a safe environment | Yes | Yes | Yes |
| Publish to internal testers | Full testing when you don't have staging | Yes | Yes | No |
Preview in editor
Use this for a quick visual check while you're still building.
- The checklist renders in the right-side panel as an end user would see it.
- Walk through the checklist: verify the beacon color, title, item names, and congratulations screen.
- Preview shows you how the checklist looks but does not test page targeting, audience targeting, or completion criteria. For those, publish the checklist using one of the methods below.

Publish to a staging environment
This is the most thorough testing method. It puts the checklist live on an internal environment where real targeting, completion logic, and flow interactions all work — without any risk to your end users.
- Add your staging domain to the Available Domains list. Go to Settings > Domains and enter your staging URL (e.g.,
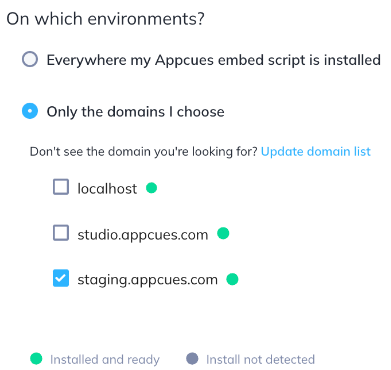
staging.yourapp.com). You need admin permissions for this step. See Manage Available Domains for details. - Open your checklist's settings page and go to Page Targeting.
- Under Environment, select your staging domain only. Deselect production domains so end users don't see the checklist during testing.
- Click Publish.
- Log in to your staging environment as a user who matches the audience targeting.
- Run through the test checklist (see What to verify during testing below).
- When testing is complete, update the domain targeting to include your production domain and republish.
Publish to internal testers
If you don't have a staging environment, publish the checklist to production but restrict the audience to your team.
- Open your checklist's settings page and go to Audience.
- Select Specific users and add a condition that isolates your testers. Options include: By email domain:
email→ contains →@yourcompany.comBy specific user IDs:userId→ equals → your test user's ID. To find your user ID, open the Appcues debugger on any page where Appcues is installed — your user ID is displayed at the top. By segment: Create a "QA testers" segment with your team's user IDs or email addresses, then select Users in a segment → your QA segment. - Click Publish.
- Log in to your production app as one of the targeted testers.
- Run through the test checklist (see What to verify during testing below).
When testing is complete, update the audience targeting to your intended end-user audience and republish.
While this method puts the checklist live in production, only users matching your restrictive audience will see it. No end users are affected as long as your targeting conditions are correct.
What to verify during testing
After publishing to staging or internal testers, walk through this checklist systematically:
Appearance and behavior
- The beacon appears in the correct position (bottom-left or bottom-right).
- Clicking the beacon opens the checklist with the correct title, description, and items.
- Colors, fonts, and text match your configuration.
- The display behavior works as expected: if set to "Open once, closed after," refresh the page and confirm it starts closed on the second load.
Page and audience targeting
- Navigate to a URL that should show the checklist — confirm the beacon appears.
- Navigate to a URL that should not show the checklist — confirm the beacon is gone.
- If possible, log in as a user who does not match the audience targeting and confirm the checklist doesn't appear.
- Use the diagnostics tool: enter a user ID and URL, switch to the Checklists tab, and verify the eligibility status matches your expectations.
Item completion
- Click each item and confirm it performs the correct action (navigates to a page or launches a flow).
- Trigger the completion criteria for each item and confirm it checks off. For event-based criteria, verify the event fires in Events Explorer after you perform the action.
- If using "Complete in order," confirm that locked items can't be clicked until the previous one is done.
- Complete all items and confirm the congratulations screen appears with the correct message and image.
Flow interactions
- If any items launch flows, confirm the flow appears correctly when launched from the checklist.
- If a flow is set to Show Manually, confirm it only triggers when launched from the checklist — not automatically on page load.
Reset your profile for repeated testing
After completing or dismissing a checklist during testing, you need to reset your user state to test again. Dismissed checklists and completed items won't reappear on their own.
- Go to the Users page in Studio.
- Search for your test user.
- Open the user's profile and click Reset User Profile.

This resets all flows, experiences, and tracked events for that user. The next time the user loads a page with Appcues installed, their profile is recreated in an empty state.
This resets everything for the user — not just the checklist you're testing. All flow history, event history, and experience interactions are cleared. If you're testing alongside other live experiences, be aware they'll also reset.
- Return to your app and reload the page. The checklist should appear as if the user is seeing it for the first time.
- Walk through your test cases again.
To re-show a dismissed checklist to a single user without resetting their entire profile, use Appcues.show('CHECKLIST_ID') via the JavaScript API. This ignores targeting and forces the checklist to appear, but completion won't be reset.
If something isn't working during testing
- Checklist doesn't appear after publishing: Open the Appcues debugger and verify all installation checks pass. Then use the diagnostics tool to check eligibility — the most common causes are a domain mismatch (you published to staging but you're on production, or vice versa) or an audience condition your test user doesn't meet.
- Checklist item doesn't check off: Verify the completion criteria in the builder matches what you're doing in the app. If using an event, go to Events Explorer and confirm the event fired for your user. If using a property, check the user's profile and verify the value updated.
-
Checklist doesn't reappear after reset: Make sure you reloaded the page after resetting. The reset takes effect on the next
Appcues.identify()call, which typically fires on page load. If it still doesn't appear, check that your user's refreshed profile still matches the audience targeting (the reset clears properties, so any property-based targeting conditions may no longer match until properties are re-sent). - Flow launched from checklist doesn't appear: Confirm the flow is published and that its trigger is set to Show Manually. If the flow has its own audience targeting, those rules are ignored when the flow is launched from a checklist — but the flow must still be published.
If it's still not working, collect:
- Checklist ID (from the URL on the settings page)
- User ID of the test user
- The URL where you're testing
- Screenshot of the debugger showing installation status
- Screenshot of the diagnostics tool eligibility panel for the checklist
Then contact Appcues support.